Small Envelope Tutorial: for seeds, buttons etc.
You will need:
- Paper or thin card
- Glue Stick
- Any embellishments you are likely to use
- Ruler
- Pencil
- Scissors
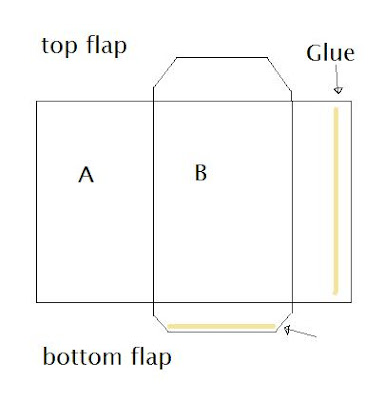
Start by determining the size of your required envelope. If you want a small envelope for collecting seeds or holding small objects, I would suggest 10cm by 6cm. Use this diagram to draw on your paper or card, altering your measurements to fit. You need to draw on what will be the inside of the envelope.

So if your finished width is 6cm, then both A and B need to be 6cm wide. The additional flap to the right of B can be any width - I would suggest it is roughly a third of the finished size, so in this case, 2 cm.
The bottom flap does not need to be very big {1-2 cm} but I would suggest it is a little deeper if you are going to put something heavy in it.
So: A and B should be 6cm x 10cm, the side and bottom flaps around 2cm and the top flap 3-4 cm.
Once you are happy with your drawing, cut and then gently score all the lines. Fold and press with a fingernail. All the flaps should now face in.
 |
| Diagram before lines are scored |
Use glue stick on the side flap, press down A over B and press the glued flap so that it overlaps B.
Then glue the bottom flap and press up.
Decorate your envelope as desired.
 |
| Pattern inside, pattern outside: both look good! |
You can either push the top flap into the envelope or use glue or washi tape to seal. If you made 24 of these little envelopes, you could use them at Christmas as an alternative advent calendar.
Love Mrs Jones x


Comments
Post a Comment
I love to hear your views on my blog, so please do stop by and comment!